Headswaps
Here's my attempt at a step by step guide on how to do it - a really simple task, that just seems very daunting. All you really need is a little confidence in what you are doing. But be warned - once you've done a few, it becomes quite addictive.
First clean up your figures, removing any mould lines and flash. This is especially important for the head, do this whilst still attached to the sprue. (As it is much easier to do now.)

Next up the scary bit. It's only scary the first time you remove a head. Grab the head with a pair of pliers and twist. Try and twist in one smooth motion, and keep going until the head comes off.
The 'head twist' doesn't work for some figures, mainly because of their pose. In these cases you will have to cut them off. I have a nifty pair of snips that does the job cleanly. However I do much prefer the head twist method as it leaves a much clearer 'target' area for the replacement head
First clean up your figures, removing any mould lines and flash. This is especially important for the head, do this whilst still attached to the sprue. (As it is much easier to do now.)

Next up the scary bit. It's only scary the first time you remove a head. Grab the head with a pair of pliers and twist. Try and twist in one smooth motion, and keep going until the head comes off.
 |
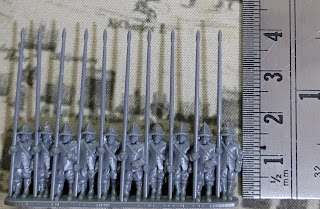
In case you are wondering, those are really small pliers, not an extreme example of 15mm scale creep |
The 'head twist' doesn't work for some figures, mainly because of their pose. In these cases you will have to cut them off. I have a nifty pair of snips that does the job cleanly. However I do much prefer the head twist method as it leaves a much clearer 'target' area for the replacement head
Next up you need to put a pilot hole for the hole you are about to drill. I find using a thick, sharp needle easiest.
I found an 0.3mm RC fuel line cleaning pin (approximately 12cm long steel pin, which can be sharpened using a needle file) which I have found to be absolutely perfect for the job. A sharpened darning needle works just as well.
I found an 0.3mm RC fuel line cleaning pin (approximately 12cm long steel pin, which can be sharpened using a needle file) which I have found to be absolutely perfect for the job. A sharpened darning needle works just as well.
Warlord Epic P&S owners I've given drill bit sizes for Peter Pig heads; sorry I don't know what size drill bits are required for the new Warlord Epic heads.
I've adopted a two stage drilling process; sometimes the modelling gods are not looking favourably on me, and I make a complete hash of things. By utilising the two step drilling process I can easily fix the problem without having destroyed the figure.
Once you've made a pilot hole, it is time to start drilling with a 1mm bit using a pin vise. Sometimes, no matter how careful you are, you find you have drilled slightly in the wrong spot, a sideways facing head can sometimes disguise such an error, if it doesn't look right fill the hole with greenstuff and try again another day, remembering to make several offerings of mugs of tea to the modelling gods.
Once you've made a pilot hole, it is time to start drilling with a 1mm bit using a pin vise. Sometimes, no matter how careful you are, you find you have drilled slightly in the wrong spot, a sideways facing head can sometimes disguise such an error, if it doesn't look right fill the hole with greenstuff and try again another day, remembering to make several offerings of mugs of tea to the modelling gods.
 |
| With the 1mm drill bit still in place it is fairly easy to check that you have the hole in the right place |
 |
| That'll do |
As you drill deeper, drill slowly, a bit of water to lube the drill bit helps.
The 'stalks' of the replacement heads are closer to 1.5mm, either widen the hole with an X-Acto blade point (quicker but riskier) or drill again with a 1.5mm bit (safer but slower). I've found it easier doing it this way rather than drilling straight off with a larger drill bit - the few times I have completely stuffed a figure up I have tried to drill straight off with a larger drill bit.
If you are drilling more than one figure I suggest wrapping the figure in Blu-Tack - easy to grip, no slipping, and most importantly you don't get sore fingers from the figures digging into your flesh. Having a Blu-Tack overcoat also helps prevent bending figures' ankles when you have to apply some effort when drilling trickier figures/harder metals.


Top tip: sideways looking heads look more 'unique'.
If it is a good fit, time to get the superglue out. I find using a cocktail stick as a brush helps (and reduces the likelihood of me gluing my fingers together.) If it's a bit of a loose fit, try a little bit of Citadel liquid greenstuff in the hole - works wonders, and makes a super strong bond too (plus it's ready mixed so you don't waste loads as you'll only need to use a tiny amount).

Here's the completed command group for my Scots lancers:

As I have reorganised all my casualty markers so that they are unit specific, I decided that the generic harquebusier casualty figure (that I assign to my cavalry units) just wouldn't cut the mustard. Yes, you guessed it - a headswap. Warning, this one had the potential to involve the local A&E, stitches and lots of blood. So if you are so inclined, be really careful, always make sure the X-Acto blade is going away from you; use plenty of Blu-Tack to keep the figure in position; and, however tempting it is to pare the head down towards you... just don't!

The 'stalks' of the replacement heads are closer to 1.5mm, either widen the hole with an X-Acto blade point (quicker but riskier) or drill again with a 1.5mm bit (safer but slower). I've found it easier doing it this way rather than drilling straight off with a larger drill bit - the few times I have completely stuffed a figure up I have tried to drill straight off with a larger drill bit.
Caution - I've noticed that some of the Peter Pig head packs have thinner 'stalks' - check what size hole you need before you drill!
Cut the head and stem from the sprue. Dry fit it first, you might need to carefully use a needle file to help it fit /clean up the torso at this point. Some poses will require a notch cutting for the new head's chin to sit properly - this is particulalrly evident with firing figures, and heads with beards.
Cut the head and stem from the sprue. Dry fit it first, you might need to carefully use a needle file to help it fit /clean up the torso at this point. Some poses will require a notch cutting for the new head's chin to sit properly - this is particulalrly evident with firing figures, and heads with beards.
To speed things up I own two pin vises: one that I have fitted with a 1mm bit, the other a 1.5mm bit. The ability to swap between drill bit sizes without having to constantly swap bits in and out of a pin vise speeds things up considerably.
If you are drilling more than one figure I suggest wrapping the figure in Blu-Tack - easy to grip, no slipping, and most importantly you don't get sore fingers from the figures digging into your flesh. Having a Blu-Tack overcoat also helps prevent bending figures' ankles when you have to apply some effort when drilling trickier figures/harder metals.

 |
| Zoom in to see hot Blu-Tack action |

If it is a good fit, time to get the superglue out. I find using a cocktail stick as a brush helps (and reduces the likelihood of me gluing my fingers together.) If it's a bit of a loose fit, try a little bit of Citadel liquid greenstuff in the hole - works wonders, and makes a super strong bond too (plus it's ready mixed so you don't waste loads as you'll only need to use a tiny amount).

Here's the completed command group for my Scots lancers:

As I have reorganised all my casualty markers so that they are unit specific, I decided that the generic harquebusier casualty figure (that I assign to my cavalry units) just wouldn't cut the mustard. Yes, you guessed it - a headswap. Warning, this one had the potential to involve the local A&E, stitches and lots of blood. So if you are so inclined, be really careful, always make sure the X-Acto blade is going away from you; use plenty of Blu-Tack to keep the figure in position; and, however tempting it is to pare the head down towards you... just don't!

No matter how good the sculpts are, there is always the odd figure in a range that we just don't get on with: headswapping is a really good way of fixing this problem (although it probably isn't a problem for lots of other people). My own personal bugbears are: from the marching command pack - the drummer in a morion is much better with a montero or wide brimmed hat; the officer is better, but he too benefits from a different head; and from the halberdiers pack the man sporting a morion (I think there might be a theme developing here), he looks so much better with a different head.
If you enjoyed reading this, or any of the other posts, please consider supporting the blog.
Thanks.


Looks a bit brutal, but very effective nonetheless :-)
ReplyDeleteAgreed. I think the brutality is what stopped me from doing headswaps. Once you have got over that bit, it is a really simple and easy way of adding uniqueness to figures.
ReplyDeleteExcellent work! I'm more of a painter and less of a modeler: after decades of painting, I did my first head swap last spring on a 28mm ECW Bloody. But this might make me reconsider my aversion. Thanks for the post!
ReplyDeleteThanks for your kind words. Once you take the plunge, it becomes slightly addictive. You have been warned...
Delete